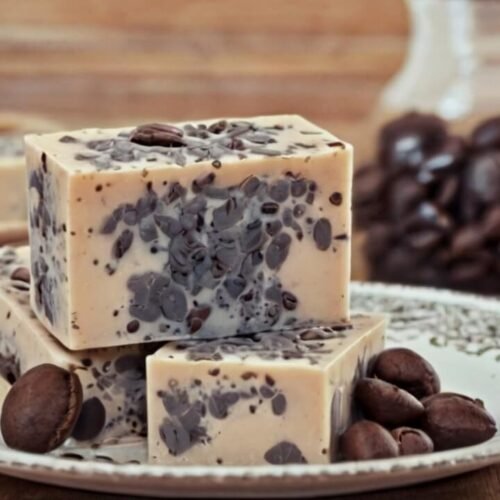
Melt And Pour Coffee Soap Recipe
Want to make your own coffee soap at home? This Melt And Pour Coffee Soap Recipe is perfect for beginners.
Coffee soap smells amazing and feels great on your skin. It helps remove dead skin cells gently. Plus, it’s super easy to make.
You don’t need fancy equipment or special skills. Just follow this simple Melt And Pour Coffee Soap Recipe.
Your homemade soap will be ready in no time. Let’s learn how to make this wonderful coffee soap together!
When I First Discovered Melt And Pour Coffee Soap
I was tired of boring store-bought soaps. One day, my friend gave me homemade coffee soap. It smelled incredible and made my skin soft.
I was amazed by how simple it was. She shared her Melt And Pour Coffee Soap Recipe with me. I tried it that same weekend.
The process was so easy and fun. Now I make coffee soap for everyone. It’s become my favorite DIY project.

Equipment List
You need just a few basic tools. Here’s what to gather:
- Microwave-safe bowl or double boiler
- Soap mold (silicone works best)
- Wooden spoon or spatula
- Measuring cups and spoons
- Small whisk
- Cutting board and knife
Ingredients You Need for Melt And Pour Coffee Soap
This recipe makes about 6 bars. Here are the ingredients for Melt And Pour Coffee Soap:
- 1 pound melt and pour soap base
- 2 tablespoons ground coffee (used or fresh)
- 1 tablespoon coffee extract or brewed coffee
- 10 drops coffee fragrance oil (optional)
- 1 teaspoon coconut oil
Step-by-Step Guide
- Set up your equipment on a clean counter.
- Cut the soap base into small cubes.
- This helps it melt faster and evenly.
- Prepare your mold by placing it nearby.
- Put soap cubes in your microwave-safe bowl.
- Heat for 30 seconds at a time.
- Stir between each heating interval.
- Continue until completely melted and smooth.
- Stir in ground coffee, coffee extract, and coconut oil.
- Mix well to distribute everything evenly.
- Add fragrance oil if you’re using it.
- The mixture should smell wonderful now.
- Carefully pour the mixture into your soap molds.
- Work quickly before it starts hardening.
- Tap the mold gently to remove air bubbles.
- Allow soap to cool at room temperature.
- This takes about 2-3 hours.
- Don’t rush by putting it in the fridge.
- Pop out once completely hardened.
Tips to Make the Best Melt And Pour Coffee Soap
- Use fresh coffee grounds for better exfoliation.
- Used coffee grounds work too and reduce waste.
- Don’t overheat your soap base, it can burn.
- Stir gently to avoid creating too many bubbles.
- Add coffee grounds last to prevent them from sinking.
- Use silicone molds for easy soap removal.
- Experiment with different coffee types for unique scents.
FAQs About Melt And Pour Coffee Soap
Q: How long does homemade coffee soap last?
A: It lasts 6-12 months when stored properly. Keep it in a cool, dry place.
Q: Can I use instant coffee instead?
A: Yes, instant coffee works perfectly fine. Use the same amount as ground coffee.
Q: Is coffee soap good for all skin types?
A: Yes, it’s gentle for most skin types. Do a patch test if you’re sensitive.
Q: Why is my soap sweating?
A: Melt and pour soap attracts moisture naturally. Wrap it in plastic wrap for storage.
Q: Can I add other ingredients?
A: Absolutely! Try adding honey, oatmeal, or essential oils. Get creative with your recipe.
Final Thoughts
Making your own Melt And Pour Coffee Soap Recipe is incredibly rewarding. You control what goes on your skin.
It’s cheaper than buying fancy artisan soaps. Plus, homemade soap makes wonderful gifts for friends. The coffee scent energizes your morning shower routine.
Your skin will feel smooth and refreshed. Start making this coffee soap recipe today. You’ll love the results!
More Amazing Recipes
- 15 Mouthwatering Slider Recipes
- 14+ Dutch Oven Camping Recipes
- 14+ Budget Friendly Chicken Dinner Recipes
- 14 Healthy Winter Ground Beef Recipes
Melt And Pour Coffee Soap Recipe
Equipment
- Microwave-safe bowl or double boiler
- Soap mold (silicone works best)
- Wooden spoon or spatula
- Measuring cups and spoons
- Small whisk
- Cutting Board and Knife
Ingredients
- 1 pound melt and pour soap base
- 2 tablespoons ground coffee used or fresh
- 1 tablespoon coffee extract or brewed coffee
- 10 drops coffee fragrance oil optional
- 1 teaspoon coconut oil
Instructions
- Set up your equipment on a clean counter.
- Cut the soap base into small cubes.
- This helps it melt faster and evenly.
- Prepare your mold by placing it nearby.
- Put soap cubes in your microwave-safe bowl.
- Heat for 30 seconds at a time.
- Stir between each heating interval.
- Continue until completely melted and smooth.
- Stir in ground coffee, coffee extract, and coconut oil.
- Mix well to distribute everything evenly.
- Add fragrance oil if you’re using it.
- The mixture should smell wonderful now.
- Carefully pour the mixture into your soap molds.
- Work quickly before it starts hardening.
- Tap the mold gently to remove air bubbles.
- Allow soap to cool at room temperature.
- This takes about 2-3 hours.
- Don’t rush by putting it in the fridge.
- Pop out once completely hardened.
Notes
- Use fresh coffee grounds for better exfoliation.
- Used coffee grounds work too and reduce waste.
- Don’t overheat your soap base, it can burn.
- Stir gently to avoid creating too many bubbles.
- Add coffee grounds last to prevent them from sinking.
- Use silicone molds for easy soap removal.
- Experiment with different coffee types for unique scents.